Posted on

How to save on clutch replacement costs?

Hello!

So you’ve been asked to replace your clutch assembly. Or perhaps you’re having trouble operating your clutch, which was doing absolutely fine until sometime back. Either way, read on to find out all about the clutch, and how you can keep your clutch replacement costs in control.

What is a clutch?

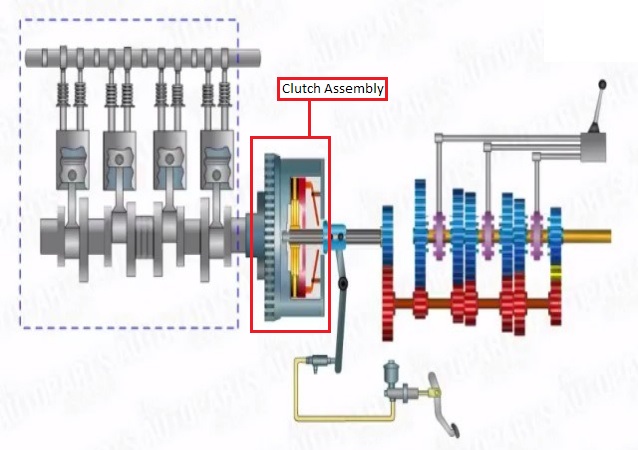
The clutch (or more accurately the clutch assembly) is a set of components that work together with one simple goal – disconnect the engine from the transmission (and consequently from the wheels) when you push the clutch pedal all the way down, and gradually reconnect the engine back to the transmission, when you release it. Here is a simple diagram of the clutch assembly. To get a sense of how this diagram is oriented, let us tell you that the flywheel is on the engine side and is fixed to the crankshaft, while the clutch disc is on the gearbox side, and is connected to the transmission.

How a clutch works

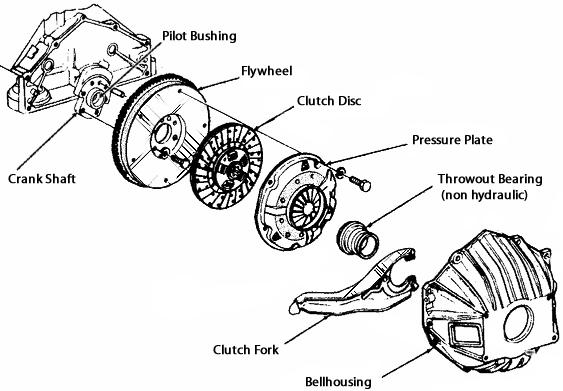
Remember that during normal operation, the engine is always spinning. In other words, we want to disconnect, reconnect, or gradually reconnect a spinning engine to the transmission, depending on our driving needs. When referring to the ‘clutch’, we’re usually referring to the ‘clutch assembly’. An ‘assembly’ consists of more than one part – it is a set of parts that work together to achieve a certain function.

Why do cars need a clutch?

Imagine if the engine were to be always connected to the transmission via a set of gears. What would have happened when you started the engine? Since ‘spinning’ the engine would mean turning the wheels as well, because they are always connected, the starter motor would have had to lug the car forward each time you started the engine! That would certainly have damaged the starter after a few such starts. Also, when you wished to change gears, say from the first to second, or from first to reverse, without a clutch to separate the engine from the transmission, you would have heard a grinding noise each time you tried to shift the transmission from one gear to the other! That would have damaged the gears very soon! Note that why cars need a gearbox with more than one gear in the first place is a different topic, and we’ll save that for a difference article.

So now we know why there is a need to disconnect the engine from the transmission, to be able to drive a car. The mechanism that does that simple yet critical task, is called the clutch. Let’s now move on to understand where the clutch assembly is located in your car.

Where is the clutch assembly located?

The clutch assembly is sandwiched between the engine and the transmission (or the gearbox), as illustrated below:

Where is the clutch located?Visually inspecting the clutch assembly requires opening up the assembly itself, and is classified as a job involving ‘major labour’ at most service stations. You cannot get a view of the clutch assembly by looking down the engine compartment or by merely raising the vehicle up on a hydraulic lift. One way to save money then is to find out whether you need a clutch replacement without opening up the clutch assembly. We’ll get to that further ahead in the article. Before that, you will want to know whether your car employs a ‘cable clutch’ or a ‘hydraulic clutch’. Hydraulically assisted clutches utilize hydraulic assistance from the engine, and thereby reduce the effort required to operate the clutch pedal.

What’s the difference between a ‘Cable Clutch’ and a ‘Hydraulic Clutch’?

A cable clutch is pulled in and out by a cable from the clutch pedal to the lever which operates it. A hydraulic clutch has a cylinder near the clutch pedal (like the brakes have one near the brake pedal), which pushes fluid in to another cylinder, which in turn pushes the lever to move the clutch in and out. The cylinder near the clutch pedal is called the Master Cylinder and the one near the clutch lever is called the Slave Cylinder. Here’s how the Master and Slave cylinders look:

Clutch Master and Slave Cylinders

The Master and Slave Cylinders, together with the hydraulic piping are the additional components in a hydraulic clutch, over and above the components already present in the cable clutch. Of course, the cable itself is not used in the hydraulic clutch. So what are the components present in a regular (or cable operated) clutch? Let’s get to that now.

What are the key parts in a clutch assembly?

The clutch assembly consists of the following components. If you find it difficult to comprehend as you read the component descriptions, we recommend you jump to the subsequent section (How does the clutch assembly work?) and watch the video first, and then come back to read this section:

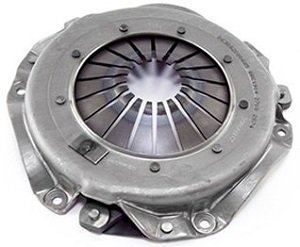
  1. Pressure Plate: This is the pressure mechanism that clamps the disc to the flywheel to get the vehicle moving. Pressing in the pedal relieves the pressure from the clutch disc to disengage the engine from the drivetrain for shifting or stopping.Clutch Pressure Plate
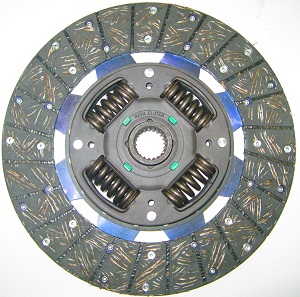
  2. Clutch Disc: The clutch disc is a flat plate with friction materials on both sides. As the pressure plate is engaged (pedal released), the clutch disc is clamped to the flywheel. When the pressure plate is disengaged, (pedal pushed in) the clutch disc is unclamped. The disc is connected to the input shaft of the transmission, causing the input shaft to turn when the clutch is engaged (pedal released), thus causing the vehicle to move. The clutch plate is connected to the central hub via springs to absorb vibrations, as the clutch pedal is released and gradual contact is made.Clutch disc or plate
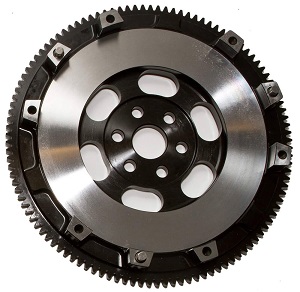
  3. Flywheel: The flywheel is an inertia device that is bolted to the engine crankshaft. It has several functions including carrying the ring gear the starter uses to crank the engine, storing energy to get the vehicle moving from a rest, and providing the friction surface for the clutch disc to be clamped to. Certain vehicles use a Dual Mass Flywheel (watch this video to understand what a Dual Mass Flywheel is), which is essentially two flywheels connected to each other using springs to absorb vibrations even before they reach the clutch plate.Clutch Flywheel
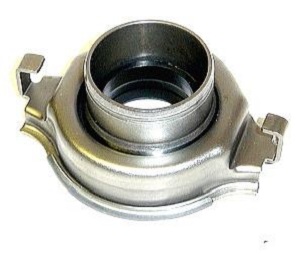
  4. Release Bearing: The release bearing is the actuating device that engages and disengages the pressure plate. When the clutch pedal is pressed, the release bearing applies pressure to the fingers of the pressure plate to disengage the drivetrain. When the clutch pedal is released, the release bearing retracts and allows the pressure plate to apply pressure to clamp the disc against the flywheel. Watch the video in the next section to view and understand this movement better. Clutch Release Bearing
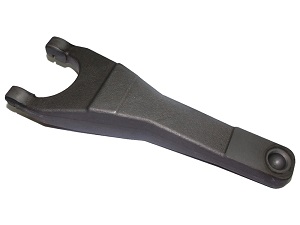
  5. Release Fork: The release fork holds the release bearing, and pivots on a ball stud as the pedal is pressed in or let out. Pushing in the pedal pivots the fork towards the pressure plate and forces the release bearing against the clutch fingers, pressing them in to disengage the clutch.Clutch Release Fork
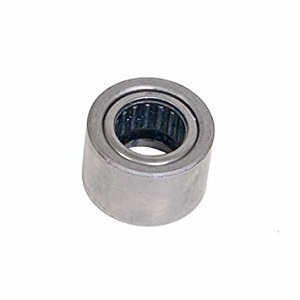
  6. Pilot Bushing or Bearing: Often not considered as part of the clutch system, the pilot bushing or bearing plays a critical role in the smooth functioning of the clutch assembly. The pilot bushing or bearing installs in the end of the crankshaft. When the transmission is installed, the input shaft tip inserts into the pilot bushing, which supports the input in the back of the crankshaft.Clutch Pilot Bearing or Bushing

How does the clutch assembly work?

How something works is best explained by a video rather than text. The following video is highly recommended if you want to understand how the clutch works in reasonable detail:

How to save on clutch replacement costs?

When does the clutch assembly need a replacement?

So how can you determine if your clutch assembly needs replacement? If you notice one or more of the following symptoms, chances are that one or more of the clutch components are worn out.

  1. A slipping clutch: Clutch slip is evident when you observe that an unexpected increase in engine speed occurs without any accompanying acceleration when your car is in gear, the clutch pedal is fully released, and you push the accelerator pedal. It will also be obvious when you attempt to accelerate up a steep hill. Though the degradation of a clutch takes place slowly over time (depending on your driving style and conditions – stop-start traffic wears out clutches faster than highway driving), if you observe a slipping clutch then it really is time to have it replaced.
  2. Hard clutch: A hard clutch could be caused due to a worn out pressure plate, air in the hydraulic line (in case of hydraulically operated clutches), or due to a clutch cable that needs lubrication. If it is being caused due to the pressure plate, the clutch assembly needs replacement.
  3. Strong smell when you start off from rest: Strong smell from the engine bay when you pull away from a standstill typically means the clutch is worn out.
  4. Change in bite point: A higher ‘bite point’ on the clutch pedal than before means the clutch needs replacement. As you release the clutch pedal, if the vehicle used to start moving with a little release earlier, it would now only start moving after you release the clutch a lot more. Sometimes this could be caused due to a stretched cable (in cable operated clutches) or a faulty Master or Slave Cylinder (in hydraulically operated clutches).
  5. Clutch judder: Clutch judder is most noticeable when setting off from a standstill. It manifests itself as a strong vibration when you release the clutch to get the car moving from rest. If you notice clutch judder, it is an indication that the clutch assembly including the flywheel might need replacement.

Does the entire clutch assembly need replacement at once?

If any of the symptoms we talked about in the previous section (When does the clutch assembly need a replacement?) appear, then the entire clutch assembly must be replaced, with the exception of the flywheel. The flywheel must be inspected for wear, and replaced if it is worn out.

But still, why replace all components at once? That’s because the clutch assembly is an intricately put together mechanism where all its different components function with millimeter level precision, and replacing just one part usually results in repeat issues, which eventually force replacement of the entire assembly.

However, there are certain conditions in which you might be able to avoid replacing the entire assembly. You must rule out these working with your service center before you give a go ahead for clutch assembly replacement:

  1. Worn release bearings: If you can hear a low rumbling sound coming from the gearbox that goes away when you press the clutch pedal then it’s possible you have an issue with the release bearing. In such cases, replacing only the release bearing should be sufficient to solve your problem.
  2. Grinding noise or Inability to slot into gear: If your clutch won’t release properly, it will continue to turn the input shaft. This can cause grinding, or may completely prevent your car from going into gear. Some common reasons a clutch may stick are:
    • Broken or stretched clutch cable: The cable needs the right amount of tension to push and pull effectively. In such conditions, replacing the clutch cable should suffice.
    • Leaky or defective Master or Slave Cylinders: If your vehicle is equipped with a hydraulic clutch, this is a possibility. Leaks keep the cylinders from building the necessary amount of pressure. If this is confirmed, replacing the defective cylinder should solve the problem.
    • Air in the hydraulic line: Air affects the hydraulics by taking up space the fluid needs to build pressure. Bleeding the hydraulic line usually eliminates the problem.
    • Misadjusted linkage: When your foot hits the pedal, the linkage transmits the wrong amount of force. An inspection of the clutch linkage can determine if this is the root cause.
  3. Clutch pedal sticking to the floor: Clutch pedals can stay on the floor if there’s a failed clutch release bearing, slave cylinder, clutch master cylinder, or clutch linkage. An inspection of these components can determine if one or more of them are the root cause of the problem.

It is often found that in addition to the root causes listed in this section, an inspection of the clutch assembly reveals that the core clutch components are also worn out, and need replacement. Only a logical troubleshooting approach can lead to accurate root causes.

How long does it take to put in a new clutch?

A complete clutch assembly replacement typically takes one to two working days to complete.

How many kilometers does a clutch last?

Predicting how long a clutch will last is like solving a complex equation with lots of variables. Any of those variables can make a big difference in how the equation is solved. Clutches can last as much as 1,00,000 kms or wear out at as little as 30,000 kms. The kilometers that you can extract from your clutch purely depends on driving conditions and driving habits.

Posted on

How to choose and buy the right car insurance?

Updated: 21st July 2020

How to choose and buy the right car insurance (India)

Broadly, car insurance policies can be categorized into two types:

  1. Comprehensive insurance policy (Own Damage + Third Party Liability): A Comprehensive insurance policy covers two types of risks – Own Damage and Third Party Liability. Own Damage covers damages caused to your car. Third party liability covers damage to life and property of other people.
  2. Third party liability only: This is the minimum every motor vehicle in India MUST have to legally drive on public roads. In other words, it is mandatory. It is illegal to drive without at least a Third party liability insurance policy. Comprehensive policies include Third party liability in them. So what does Third party liability coverage get you? In the event of an accident, if an affected third party claims that you must pay them a certain sum as damages because it is established that it was your fault, and your insurance company agrees (usually with the Police and the Court in the loop), then your insurance company pays the third party – not you. And understandably, Third Party Liability coverage is mandatory as per law. Did you know that the Third Party Liability premium is set by the Government (IRDAI)?

Additional Coverages:

Additional coverages (or add ons) are what to add to your basic comprehensive insurance policy. Here are the most common additional coverages, offered by most insurance companies:

  1. 24 x 7 Roadside Assistance [Covers Tyre change, Jump start, or Accident] [Highly Recommended].
  2. Zero Depreciation (Nil Depreciation) (Bumper to Bumper) [Expense of depreciation is covered by the insurance company after an accident [Highly Recommended].
  3. Engine Protector [Mainly covers water ingression in the Engine][Highly Recommended].
  4. Consumables [Covers cost of consumables after an accident].
  5. Key and Lock Replacement [Cost of lock and key replacement is covered by the insurance company].

Demystifying some more terminology:

Here are some important terms that you absolutely need to be aware of, when evaluating your next insurance policy:

  1. IDV (Insured Declared Value): When you tell the insurance company the make and model of your car along with its age, the insurance company assigns a certain value to your car. Sometimes they allow you to choose within a range – not a wide range – a small delta below and above the pre set IDV. The lesser the IDV, lower your premium. Keep in mind that in the event of a major accident and the car being labeled a ‘total loss’, you will only receive up to a maximum of your IDV amount against your claim. Therefore, it is important to not set a very low IDV, just to save a small amount on insurance premium.
  2. NCB (No Claim Bonus): If you don’t make a claim during the first policy year, you receive a 20% discount on your second year (own damage) premium. If you don’t claim during the second year as well, you get a 25% No Claim Bonus (discount) on your third year (own damage) premium. This eventually goes up to 50% in case you’ve had no claims in five consecutive years. The maximum NCB applicable on car insurance is up to 50%. As you can see, the NCB is a way to reward safe drivers. Did you know that when you sell your car and buy a new one, you can transfer your NCB percentage to your brand new car? It results in huge savings, given then your new car will have a higher IDV, and a higher Own Damage premium. NCB discount is applied on the Own Damage premium.

Buy online or offline?

Both methods have their pros and cons. When you buy online, and particularly when buying from aggregators who sell multiple brands on the same website, it is easy to get carried away by low premiums, and buy the policy with the lowest premium. However, it is in the event of a claim that many customers realize what they signed up for was not what they ‘thought’ they had signed up for. On the other hand, when you buy from a trusted advisor like Wheels Wisdom, chances are that you will make an informed decision. Remember, at the time of claim, no insurance company will let you alter your policy terms.

We hope sharing our experience on car insurance has been useful to you! Never drive without a valid motor insurance policy because it is illegal. Always keep a copy of your insurance policy in the glove box. Drive safe!

Posted on

When does my car need Wheel Alignment and Balancing?

Wheel Alignment and Balancing

When does my car need Wheel Alignment and Balancing?

Wheel Alignment and Balancing is often thrown at customers as an additional task to be performed during car service. Additional tasks, of course, come at an additional cost! So then the classic car owner’s dilemma kicks in – “Do I need it?”. Let’s help you decide. When do you need Wheel Alignment and Balancing?

Preventive:

Your car needs Wheel Alignment as well as Balancing every 10,000 kms.

Reactive (or symptomatic):

Your car needs Wheel Alignment or Balancing in the event any of the following symptoms show up. Remember, Wheel Alignment is generally done for the two wheels at the front, whereas Wheel Balancing is done individually for each of the four wheels so that each wheel remains in balance.

Your car needs Wheels Alignment if your:

  • Vehicle tends to drift towards the left or right of the road.
  • Vehicle hit a footpath or an obstacle.

Your car needs Wheels Balancing if your:

  • Vehicle vibrates (or wobbles) at certain speeds (needs Wheel Balancing of the affected wheel).

There are of course more advanced symptoms as well as rear wheel alignment methods, which we decided against featuring here in the interest of simplicity. We hope this article was useful. Happy motoring!

Posted on

When is the right time to sell my car?

When is the right time to sell my car?


That was the question on Neha Krishnan’s mind when her brand new sedan turned 5. She still remembers the day her promotion was announced, and how she had secretly decided to upgrade from her second hand hatchback to a shiny new  sedan.

Cut to the present, and her shiny new sedan is 5 years old. While the car has mostly been trouble free all these years, her last annual service cost her Rs.25,000. Some vital organs have started needing repairs, and some others need replacement. ‘Is this the right time to sell?’, she wondered.

Does that sound like a familiar predicament?

When is the right time to sell your car? While there can be no ‘right’ answer that suits all, most car owners part with their cars after year 3 or year 5. So is it 3, or is it 5? Or should you look at the odometer readings? 60,000 kms, 75,000 kms or 1,00,000 kms? Isn’t it prudent to keep a depreciating asset like a car for at least 10 years?

Like they say, ‘it all depends’. But on what?

The following are the key factors that must influence your decision.

Odometer milestones

1 year / 10,000 kms: This is when a car depreciates most. Definitely not a good time to sell! Your car depreciates anywhere between 20 to 30% depending on make and model, in the first year.

3 years / 30,000 kms: Most warranties will expire at the end of 3 years or 30,000 kms. This is the time when you can expect more than just the regular oil change, air and oil filter replacements. Replacement of brake pads, and minor running repairs can also be expected. A good time to sell if you’re looking for a high resale value.

5 years / 60,000 kms: By this milestone or a little after this milestone, you’ll be spending on major repairs and replacements like a clutch overhaul and new tires. Depending on how well you maintain your car, you will see one organ or the other failing with predictable frequency. Periodic service bills typically shoot up after the 5 year / 60,000 kms milestone. If you want to sell your car at a decent price, sell before this milestone.

7 years / 100,000 kms: This is the stage when the car’s health hugely depends on how it was maintained in its younger years. Badly maintained cars would have turned barely roadworthy, while well maintained cars can continue to run will fairly high levels of reliability. If selling was on your agenda though, remember that most used car buyers filter out cars that cross the 7 years / 1,00,000 kms milestone. Chances are that your car will not be spotted at all in online searches.

In addition to odometer milestones, you must also consider the following factors:

Manufacturer’s service reputation: How easy or difficult is it to service your manufacturer’s cars? This research can easily be done online. A quick call to Wheels Wisdom can also help answer this question, since our core business is servicing cars.

End of Life: Has your manufacturer stopped making the model you own? Or are they about to? If the answer is yes, sell! Serviceability and availability of spares become extremely challenging after EOL, and bring down the selling price of your car drastically.

After you have considered all of the above, if you’re still undecided and want our ‘can’t go wrong’, advice, here goes: Sell anytime between the 3 to 5 year milestones. It is a good middle ground between not losing out too much on depreciation due to a very early sale on one hand, and not ending up with a car with too many maintenance issues due to old age on the other.

Have fun and drive safe!

Posted on

Pillars of your car

A, B, C, D Pillars of cars

The A, B, C, and D Pillars

Just like in civil construction, a car’s pillars support its roof. To identify them, one needs to look at the car from one of its sides. The sloping pillar between which the windshield glass is fixed is the A Pillar. The second pillar from the front is the B Pillar, onto which the front doors click shut. The rear doors are hinged to the B Pillar as well. The C Pillar is behind the rear seat, and is the third and final pillar when it comes to hatchbacks, sedans, and small SUV’s. Larger cars with a third row of seating, like Minivans and Large SUV’s, have a fourth D Pillar, which is behind the third row.

Typically, thicker A and C Pillars (D, in case of Minivans and SUV’s) are disliked as they block the driver’s field of vision at the front and back respectively.

So the next time you hear someone talk about the A, B, C, or D Pillars of a car, you know what they’re talking about! www.WheelsWisdom.com

Posted on

How does one get a car serviced in India?

Service Assist Managed car service

So how does one get a car serviced in India?

Your car was serviced 6 months back. You’ve driven just 2000 kms. It’s time for the next service. You book a service with the service center. Spend personal time going there. Wait in a queue of cars. Finally get to speak to the advisor. He tries selling you engine decarbonization and an interior shampoo wash. You know you don’t need the latter but what about the decarbonization? You say yes anyway. You think, “There, I think I lost some money, but maybe that was necessary!” Did you know Service Advisors at dealerships make more than1/2 their salary from incentives selling Value Added Services? Anyway, let’s move on. You leave the dealership, battle city traffic in an auto and get home or to the office.

The day goes by. It’s evening, and it’s time to pick up your car. You spend personal time, beat traffic and somehow reach the service center. The advisor is nowhere to be seen. You call his mobile. He finally appears. Shows you the car and hurriedly walks you through the job done. You wish and pray that everything that was promised as done, is indeed done. You make the payment, and start your return journey. You know the service center offers ‘pick up and drop’, but can’t trust the guy who drives, plus you want to meet the advisor yourself to make sure they understand your vehicle’s needs. You sigh. You finally drive home and stay in peace. Until the next service, that is!

What if you had a friend who handled these hassles with technical expertise?

Wheels Wisdom is that friend. We tightly control your car service, and take this one hassle away from your life. Customers are becoming fans of our paranoid focus on Quality and Honesty.

Try our services today!


Posted on 4 Comments

Should you upgrade to a bigger car?

Traffic congestion in big cities, bangalore traffic

Congratulations on your raise! Now is the time to upgrade to that bigger car you’ve been dreaming about, right? Maybe not. Unfortunately, in the urban landscape, bigger is not better. Here’s why.

It’s true that bigger and fancier cars look cool in TV and newspaper advertisements. The look, the shine, the power, the badge – all announce to the world that you have arrived. Or do they? Well, if you live in one of India’s bustling metropolises, you might be getting in to a lot more hassle with that big expensive car than what you already face if you currently own a smaller car. Why? Take a look at the laundry list of troubles you’ll have to deal with when you get yourselves a bigger set of wheels. Remember, the car might be built by a multinational brand, but it still has to be driven and maintained on Indian roads!


Upgrade to a bigger car


So then, what’s our recommendation here? Well, as with all our articles, we promise to make this dilemma an easy one to get out of. Let’s do this. First, ask yourself this question – are you considering the bigger car primarily for use in the city or on outstation trips?

If you answered ‘in the city’, make sure you check out Public Transport and App Cabs first.

Is public transport from your home to work a viable option? If yes, go for it! Car ownership is a bigger hassle with super congested city roads and parking spots becoming impossible to find!

Cabs that you hail using an app turn out to be cheaper and hassle free too these days. The catch is that they’re often difficult to find during peak hours. Again, app cabs compare favorably to owning a big car and hiring a driver, when it comes to levels of fuss that go with each experience.

If neither public transport nor cabs make sense on your route, consider the following options in the order that they’re listed:

  1. Electric cars: With a 100 to 300 km range, electric cars are very practical in the city. If all you drive is 20 km a day, these cars only need to be recharged once in 3 or 4 days! They operate silently, and consume very little energy when waiting at red lights. They regenerate energy when you apply brakes or go down slopes and hills. They don’t pollute the environment. With so much going in their favor, electric cars are truly worth considering.
  2. Feature packed small cars: Auto companies realize that bigger cars are not sustainable. So does our government. Hence the excise duty benefits on cars shorter than 4 meters. In addition to making better economic sense over their bigger cousins, sub 4m cars are also hassle free to drive and park! They’re also available in a huge price range and come packed with ‘big car’ features!
  3. Hybrids: If you truly want to tell the world you’ve arrived, why not say it with a Hybrid? Instead of going for that entry level luxury brand, get yourself a hybrid. Your hybrid will say it loud and clear that you’re not just successful, but also that you celebrate your success responsibly. What’s more, if you love tech, hybrids are great fun to drive. It’s an exhilarating experience every time you see these advanced systems work their magic. Imagine, you roll off from a red right on electric drive, and then the engine automatically kicks in after a certain speed. Exciting, isn’t it?
If you answered ‘outstation trips’, we recommend the following options:
  1. Self drive rental: After decades of being an underserved market, the Indian self drive car industry is finally seeing some hot action. You not only can rent a car with very little hassle, you also get a wide choice of cars to choose from! Right from economy hatchbacks to luxury sedans! If all you need is a car for outstation trips, self drive car rental is going to be way more cost effective and hassle free than owning a big car just for this purpose.
  2. Second car for the weekend: Exhausted all options above and none of them worked for you? Have additional parking? If yes, bite the bullet – bring home that big car as your weekend ride for long distance drives only. Don’t drive it in the city to avoid all the heartburn it will invariably cause you if you do.

So, what do you think – should you upgrade to a bigger car? Make sure you make a scientific decision, evaluating all options and then come to a conclusion.

Liked the article? Like or follow our social pages on Facebook, Twitter, or LinkedIn to get your regular feed of Wheels Wisdom articles.

Posted on 1 Comment

Petrol or Diesel? Which is a better choice?

Petrol or Diesel

There are complex petrol vs diesel calculations out there to determine if you must choose a Petrol engine or a Diesel for your next car. They are arithmetic in nature, and only look at the economics of owning a Petrol vs a Diesel. Just one problem – most car buyers find them far too complex, and in fact want to think beyond just economics. Then whose cause do these calculations serve anyway?

As always, Wheels Wisdom is here to make it straight and simple. We understand complexity, and love simplifying it! Trust us, it’s very easy to decide. We make the petrol vs diesel decision as easy as selecting your lunch menu! And yes, we include economics among our parameters as well. Take a look below:

Petrol vs Diesel


Note that we kept two factors out of this mix – Cost of fuel, and Environmental impact.

Cost of fuel – The difference in prices of Petrol and Diesel vary more than the weather, and are best kept out of the decision making criteria. The data you use to draw conclusions at the time of purchase might not stay stable for even a couple of months!

Environmental impact – There is no clear winner in this department. When it comes to carbon monoxide, carbon dioxide, and hydrocarbons, Diesel engines pollute lesser. However when it comes to particulate matter, they lose out to their Petrol counterparts. Both pollute equally when it comes to nitrous oxide. With rapid advancements in both Petrol and Diesel engine technology, the equation changes in matter of months. Our view? No engine burning fossil fuels can be environment friendly. If you want to be nicer to the environment, Electric and Hybrids are the way to go!

Which side do you think you belong? Wasn’t that easy? :-).

Liked the article? Like or follow our social pages on Facebook, Twitter, or LinkedIn to get your regular feed of Wheels Wisdom articles.


Posted on 6 Comments

Automatic Transmissions (Conventional vs AMT vs CVT vs DSG)

Car Service, Repairs, and Used Car Evaluation

Our cities face an ever increasing car population, but only have so much road to offer! The result is stop and go traffic for long periods of time, and with it, hundreds of clutch presses and gear changes. Given that this is the case with all Indian cities and towns, cars with Automatic Transmissions (AT) are becoming increasingly popular. With only an Accelerator and Brake to manage, AT’s take the hassle out of shifting gears, and make long waits in traffic a little less exhausting.

Automatic Transmissions have had an interesting evolution in India. Unknown to many, AT’s have been available in India since the 1980’s, when they were made to order on Maruti 800’s for physically challenged drivers!  Fast forward to the present, and customers have a huge variety of AT equipped car models to choose from.

However, as car buyers check out these models, they also realize that unlike Manual Transmission (MT), AT technology varies from car to car, making the choice – well, confusing! As with all articles on Wheels Wisdom, we wrote this one too with one clear objective – simplify complexity for our readers.

There are primarily four types of automatic transmissions currently on offer from major Indian manufacturers. Here’s an infographic we put together to make it really easy to understand. Take a look:


Automatic Transmissions


As a buyer, you must understand that the AMT and DSG are the closest to Manual Transmissions, in so far as the directness of connection between the engine and the drive is concerned. In simple terms, you can think of the coupling as being direct, with very little loss in transmission of power. CVT’s employ a belt to transmit power,  but take advantage of infinite gear ratios, which result in high fuel efficiency. Infinite gear ratios are made possible by the use of a drum like component that has a varying diameter, as you look at it from side to side. Conventional Automatics don’t have a direct coupling between the engine and the drive at all – neither direct, nor driven by a belt. Instead, they have a fluid clutch. Again, in simple terms this means some engine power is lost in transmission, resulting in lower fuel efficiency.

Conventional Automatics are more reliable in the log run. They have been proven workhorses for decades, and are cheaper to make. The dampener in the case of conventional AT’s though, is the Fuel Economy. DSG’s on the other hand are technologically advanced automatics and are fun to drive, but still don’t offer bullet proof reliability. They are also more expensive to manufacture. CVT’s and AMT’s are not very exciting to drive, but are highly efficient and reasonably reliable as well.

That’s it! We’ve kept unnecessary detail and clutter out, so that you’re clear about what various Automatic Transmission technologies bring to you – the end customer.

Liked the article? Like or follow our social pages on Facebook, Twitter, or LinkedIn to get your regular feed of Wheels Wisdom articles.

Posted on 5 Comments

The ABC of Driving

Learn drivingAre you planning to learn driving? Welcome to the ABC of Driving! As with all articles on Wheels Wisdom, we use the simplest of words – to make complex topics easy to understand. Often new drivers are forced to learn driving with an instructor without first getting a chance to understand the steps to be followed in simple terms. We recommend that you read Know Your Car for Dummies first, before reading this article. It introduces you to the main components of a car from a driver’s perspective. Now let’s get straight to business. We promise, after you finish, you wouldn’t believe how easy it was to learn driving!

Ignition
The process of starting the engine is known as Ignition (to ‘burn’ – and in this context, petrol or diesel). In the olden days, one had to rotate a rod attached to the engine twice or thrice over to start it! But now, all you have to do is to slide in the key, turn it, and presto, your engine revs up. If you bought a car with the Engine Start / Stop button, you don’t even have to turn the key! Just walk in to the car with the smart key fob, hold down the clutch, and press the Start / Stop button to start the engine.

Key Positions
The commonly found system though is the one with a key. There are four positions you can set the key in – Lock, ACC, IGN, and Start.

Lock: This is the position in which you insert the key in, and take the key out (you will not be able to pull out the key in other positions). The position is called Lock because it locks the steering wheel in place. Yes, a thief will not be able to turn the steering wheel left or right from this position in the event of a break in.

ACC: This is the next key position, in which Accessories are powered on. This mainly includes the infotainment / music system, and the charging sockets.

IGN: In the IGN position, all warning lamps are activated, and must illuminate. The fuel and temperature gauges are also activated. A/C blowers (of course without the compressor operating since the engine is not yet running), and all other electrical systems are also available for use in this position.

Let’s get going!

Safety
Make sure the hand brake is engaged, and that the area ahead of you is clear of people (toddlers right in front of the car cannot be seen from your drivers’ seat) or large objects. Ensure that all occupants in the car are wearing a seat belt or are restrained using a child / booster seat. Make sure the Outside Rear View Mirrors are opened and correctly adjusted. Check tires for air pressure.

Starting the engine: When trying to turn the key from IGN to Start, you will notice resistance from a spring trying to bring the key back to the IGN position. This is because the key must stay in the Start position for not more than 2 to 5 seconds. In this position, your car activates a powerful motor called the starter. The starter is powerful enough to crank the engine so that it gets an initial momentum before it can run on its own. Therefore, it drains a lot of energy from the car battery. You must release the key as soon as you hear the engine running on its own.

With diesel engines, you will notice that an amber colour coil lights up for a second or two (among the warning lamps) when you turn the key to the IGN position. You must wait until this lamp goes off before turning the key to Start. This is because the ECU activates a heater to heat up the engine prior to ignition.

Manual Transmission (MT)
Keeping the hand brake engaged, press the clutch completely (to disconnect the engine from the drive), and move the gear lever into the first gear position. Now release the hand brake, slightly press the accelerator and gradually release the clutch (to gradually connect the engine back to the drive). Read that line again to clearly understand what it asks you to do. The car will move forward. Yes, it will! Remember to neatly register that feeling you will experience, in your mind. It is a moment you will love to recall for the rest of your life!
Increase your speed now by keeping the accelerator slightly pressed. Now observe the increase in engine noise. When the noise reaches a moderate level (roughly 2000 rpm on the tachometer, if you have one), you must shift to the second gear. To do this, you again must press the clutch completely, put the gear lever into second gear, slightly press the accelerator and gradually release the clutch.

Now, as you did for the second gear, continue keeping your foot on the accelerator till the engine noise reaches the moderate level again. Follow the same procedure to shift into the third gear now, and similarly to the fourth and fifth gears.

Now you know how to acquire speed. What if you need to slow down? Let’s say you’re driving in the third gear, at roughly 30 km/h.You are approaching a traffic signal. If you thought that you have to come back to the first gear in the same order in which you went up, you don’t have to! What you need to simply do is to gradually press the brake until the car slows down to say 5-10 km/h, press the clutch completely at that point, and continue braking until the car comes to a halt. Now read that line again! Why on earth do you have to press the clutch? This is because in any gear, there’s a minimum speed below which the engine cannot pull the car. You’ll know this point has reached when you hear the engine struggling. At that point, you have to hold down the clutch – else the engine will stall (turn off). What you’re doing by holding down the clutch is that you’re simply disconnecting the drive from the engine to relieve it of any load. Now how will you know which is the minimum speed for each gear? Out of experience. This is because, even if you look at the speed / gear chart provided in the owner’s manual, can you be looking at the speedometer each time you slow down? That’s not practical!

Automatic Transmission (AT)
With an AT, the responsibility of shifting gears up or down is with the transmission. The driver only has the Accelerator and a Brake pedals – no Clutch. To move your car, here’s all that you need to do:

Hold down the brake pedal, release the hand brake, and move the gear lever to the D position. You may have to press the shift button on the gear lever to be able to move it, in many AT cars. In others, there’s a certain pattern in which the lever can be moved to get to D – just follow that, and you’re good.

Once in D, take your foot off the brake. The car should start moving forward (in some AT’s). This motion is called Creep. Certain other AT’s will not creep, and you must press the Accelerator gently to start moving ahead.

That’s it, the AT will take care of upshifting gears. When you need to slow down, gradually press the brake pedal. The AT will manage downshifting of gears, and will ensure that the transmission is slotted in the right gear the next time you press the Accelerator.

The N position is for Neural. You don’t need it during regular drives.

The R position is for reversing.

The P position (not available in some AT’s) must be selected when the car is parked. P keeps the engine in neutral, and also locks the wheels in place. Remember to engage the hand brake as well after parking the car.

Note that we’re not discussing different types of AT’s like Hydraulic, AMT, DSG, or CVT in this article to keep it simple.

Steering the car
Hold the steering wheel with both hands for better control, at the same time taking care to position your fingers appropriately so as to be able to easily use the horn buttons when necessary.
You must note that taking care of the front half of the car is not enough. The rear half is behind you, and must be taken care of! This is to be specially noted while negotiating turns. When you turn, in addition to manoeuvring the front of the car, you have to watch where the rear wheels are going. Similarly, while trying to turn while reversing, you must remember to watch the front corners of your car.

Let’s keep moving
Turning
Now that you know how to move and to stop, you are ready to learn how to turn. As you approach a turn, switch on the right or left indicator and slow down well in advance to avoid a sudden braking later. When you reach the turn, turn the steering wheel in such a way that the car turns into the left hand side of the road you’re taking (in India). Once you are in there, accelerate again and work up the gears. That’s it! Didn’t think it was this simple, did you?
Note that turning involves a reduction in speed. Therefore, you will need to come down to a lower gear before accelerating after the turn.

Reversing
There are occasions when you need to move the car backward. The prerequisite for gaining expertise in the reversing department is that you must be in total control of the car as far as the accelerator, brake and clutch are concerned. Once that’s there, you need to get the steering right. And that, is no big deal.

To move backward, first press the clutch completely and slot the gear into reverse (MT) or move your gear selector to R holding down the brake (AT). Now, turn back and look over your shoulders to make sure the area behind the car is clear. Release the clutch gradually while gently pressing the Accelerator (MT) or let go of the brake, and gently press the Accelerator (AT), all this while looking where the car is heading and adjusting the steering. The important thing here is, you must be able to easily work with the pedals even when you are looking back. Once you have them in control, it’s easy to steer the car as you move backward. Well, that’s it! You must be able to do a fine job reversing now.

Conquering a bridge
When you approach a bridge, you may either be approaching at a high speed or you could be part of a queue of vehicles, inching forward to the bridge; the latter being more probable in a city. If you think you have enough momentum to keep going without shifting to a lower gear, keep going as you are. On the way up, if you feel that the gear you are in, say fourth, is not able to pull the load, you must shift to the next lower gear, third, in this case. Lower the gear, more the power, remember? Stay in gear when going down the bridge as well. Never slot the gear in neutral or switch off the engine to save fuel, while going down any slope. Let’s just say you run the risk of losing control over the car if you do that. I came, I saw and I conquered (the bridge), eh?

Engine braking
When going down a hill or any slope, you may need to keep the car from picking up too much speed. This is especially true if you’re also dealing with turns as you go down the hill. In such situations, keep your car in lower gears (typically 1st, 2nd, or 3rd) and let go off all floor pedals. Gravity will pull the car downward, but the engine (yes, the engine!) will hold the car at a lower speed (the lower the gear, the lesser this speed). This is known as engine braking. With engine braking, you only need to use additional braking using the brake pedals occasionally. This greatly enhances brake life, especially if you drive in hilly areas frequently. Never go down a hill in Neutral. The car will pick up too much speed, and continued use of brakes will cause the brake pads to overheat, and lockup.

Remember to always leave home early so that you don’t have to hurry on the road. When you do hurry on the road, you’re putting your own, and others’ lives in danger.

All the best and happy driving!

Liked the article? Like or follow our social pages on Facebook, Twitter, or LinkedIn to get your regular feed of Wheels Wisdom articles.

Posted on 2 Comments

Know Your Car for Dummies!

Learn driving

Planning to learn driving? Welcome to Know Your Car for Dummies!

Often new drivers are asked to carry out a series of actions purported to be ‘the way you must drive’ a car. However, no one explains ‘why’!

This article will introduce you to the key components of your car from a driver’s perspective. Once you understand the function of these components, you’ll notice that you’re able to appreciate the why’s behind the what’s, making it way easier to learn driving.

Note that we’ve used the simplest of English language to make it just that – simple!

Say Hello To Your Car
Congratulations on having procured one of the finest inventions of mankind, the automobile! Now it’s important to get to know your car well. That’s because when you understand your machine, you’re in better control of it. That makes you a more confident driver, and the roads much safer. Let’s get started!

The Accelerator
Consider the accelerator as a tap. As you open it, you let more fuel into the engine. The accelerator is attached to a spring such that it returns to the ‘close’ position after you take your foot off it.

The Brake
The brake is a mechanism using which you can reduce the speed of your car. When you press the brake pedal, a pair of arc shaped pads is pressed against the wheel disc (disc brakes), or the wheel drum (drum brakes). Due to the friction between the pads and the disc or drum, the car slows down. The mechanism works on all four wheels. The Parking Brake, on the other hand, usually holds only the rear wheels in position. The Parking Brake must not be used when the car is in motion. The only exception is in case of a brake failure, when it must be used gradually to bring the car to a safe stop.

The Clutch
The clutch is used to connect or disconnect the engine and the drive. Now, what’s a drive? The drive is the mechanism that transfers power to the wheels. So if the clutch is completely pressed, the engine runs independently without transmitting any power to the wheels. If you don’t press it at all, engine movement is entirely transmitted to the wheels.

So, what about the intermediary stages, when it is partially pressed you ask? When completely pressed, and then released gradually, you are allowing more and more, and finally the entire engine power to work on your wheels. However, all of this is true only when the car is ‘in gear’ (any gear other than Neutral).

To comprehend this fully, you need to understand the gear system. Yes, let’s demystify the gears now! Read on.

The Gear System

Manual Transmission (MT)
Most MT cars have a five speed gearbox. A five speed gearbox has seven gear lever positions. Five forward gears, a reverse gear, and a neutral position. Each one has its own characteristic:

Neutral – Engine disconnected from the drive (or wheels).
1st Gear – Maximum pulling power, Least speed.
2nd Gear – Lesser pulling power, more speed.
3rd Gear – Still lesser pulling power, still higher speed.
4th Gear –  Even lesser pulling power, even higher speed.
5th Gear (also known as overdrive) – Least pulling power, maximum speed.

Reverse Gear – Maximum pulling power, Least speed – just like the 1st gear, but in the reverse direction.

So now you know! Why are you asked to engage a lower gear after slowing down from high speed? Because you need more pulling power to accelerate from a lesser speed. Similarly, why are you able to engage higher gears only after gaining some initial speed? Simple – because higher gears have lesser pulling power. In other words, if you want to start off from rest in the 5th gear, it is going to be very difficult for the engine to move the car ahead, almost not possible unless you’re doing it to show off your skills (it’s tricky, can be done, but will strain the engine – Not good)!

Automatic Transmission (AT)
With an AT, the fundamental difference one notices as a driver is the absence of a clutch – and that’s a good thing! The AT takes care of shifting gears up and down, and all the driver has to do is use the Accelerator and the Brake. Remember that you must use only one foot to drive an AT – and that foot operates either the Accelerator, or the Brake – never both at the same time. It is a wrong practice to drive an AT with the right foot on the Accelerator and the left foot on the Brake. An AT has four main gear lever positions:

P – Park: There is no equivalent of this mode in MT cars. When in P, the engine is disconnected from the drive (like in Neutral). However, in addition to that, the wheels are also locked in position – the car won’t move forward or backward.
R – Reverse: This position is used to reverse the car.
N – Neutral: Just like in MT cars, the engine is disconnected from the drive.
D – Drive: The regular forward driving mode. The transmission takes care of shifting gears up and down.

There are few other modes one may find in an AT car – like 1, 2, 3, etc. These are equivalent to the 1st, 2nd, and 3rd gears in MT cars. They’re used when climbing or going down a hill, when the driver might want to keep the vehicle in a particular gear without auto shifting up or down.

Front Wheel Drives (FWD), Rear Wheel Drives (RWD), and All Wheel Drives (AWD):
In cars where power from the engine is transferred to the two wheels in the front, it is said to be a Front Wheel Drive. In this case, the rear wheels are just tagging along!

Conversely, if the engine is working the rear wheels, the car is said to be a Rear Wheel Drive. The front wheels rotate because the car is being pushed forward by the rear wheels. Rear Wheel Drives also have a component called the Differential (the big spherical object you may have noticed between the two rear wheels of buses and trucks), that allows the inner rear wheel to rotate slower than the outer rear wheel, during a turn.

All Wheel Drives are complex systems where engine power is distributed to all four wheels. The vehicle’s mechatronics manages the complex task of determining how much power must be sent to each wheel, at any given time.

The Steering Wheel:
The steering wheel is the circular ‘ring like’ device, right in front of the driver’s seat. You would also find the horn buttons, light and wiper stalks, audio and phone controls, cruise control, and paddle shifters in and around the steering wheel. The steering wheel is rotated clockwise and anti-clockwise depending on whether you want to turn the car to your right or left respectively. The steering wheel is attached to a spring mechanism such that it returns to the ‘wheels straight’ position as soon as you leave it after a turn. This is called self centering action. The force of self centering action varies from car to car, and it is a good idea to only loosely let go off the steering when self centering, so that you can manually turn it back straight quickly if necessary.

Power Steering:
Power Steering is an arrangement by which, as you start turning the steering wheel, you get hydraulic or electric assistance, due to which you only need to exert part of the force needed to actually turn the wheels left or right. Remember, more the weight of the car bearing down on the wheels, the more difficult it is to turn the steering left or right. So with power steering, driving fatigue is greatly reduced.

The Indicators
As you drive on the road, you need to communicate with other drivers. This is required since you must let others know what you plan to do the next instant, so that they manoeuvre their vehicles accordingly. The indicators, which are orange coloured lamps on either side of the car, flash on and off when put on. Putting on the right indicators indicate that you plan to turn right, and putting on the left indicators indicate that you plan to turn left. Simple!

Hazard Warning Lamps
You may have noticed a button at the centre of the dashboard with a red triangle on it. When switched on (and this doesn’t require the keys to be inserted or be in any position), all indicators – both left and right start blinking. Hazard Warning Lamps must be used when your car could potentially cause an accident, and you want to warn other road users about it.

The Headlights:
The headlights are a pair of bright focussed lamps in the front of the car. They must be used in low visibility conditions during the day, and at night.
Headlights have two settings – the High Beam, and the Low Beam. The two settings are made possible by having two filaments within each bulb. In Projector Headlamps, this is achieved using a more complex arrangement.

The High beam is used while driving on dark open roads, like a national highway, where long distance visibility is essential. A disadvantage of using high beam is that it blinds drivers approaching from the opposite direction. Therefore, in such situations, the headlights must be temporarily set to low beam. It can be brought back to high beam once the other vehicle has passed. The low beam on the other hand focuses light on to the road, rather than straight ahead. In cities, where roads are well lit, only the low beam must be used to avoid blinding other drivers.

The Tail Lamps
The tail lamps are red coloured lamps at the rear end of the car. They turn on whenever the parking lights or the headlights are put on. The bulbs used in this case are also double filament type. The second, and brighter filament is used for the brake lamp. They turn on whenever the brake pedal is pressed. They help you warn the vehicle behind during braking.

The Reversing Lamps
Reversing lamps, as the name suggests, turn on whenever the reverse gear is engaged. The lamps are located at the rear of the car, and help the driver see behind the car in the night or during low visibility conditions.

The Parking Lamps
The parking lamps are located within or adjacent to the headlights. They must be turned on when the car is parked on a street at night, so that other drivers approaching from a distance can spot it. The tail lamps also turn on whenever the parking lamps are switched on. Do note that parking lamps are not very bright, and if the car is parked on the highway, the Hazard Warning Lamps must be used in addition to the parking lamps.

The Cabin or Courtesy Lamp
The cabin or courtesy lamp is located inside the car, and turns on whenever a door is opened. It can also be switched on using a switch, if all doors are closed. In some cars, only the front doors activate the courtesy lamp. In certain other cars, cabin lamps stay on for a few seconds after all doors are closed. They turn off after a set time, or when the ignition key is switched to the IGN position.

The Wipers
The wiper is used to wipe off water from the windscreen (the glass sheet in front of the car, through which you look out), when it rains. A pair of wipers is normally present on the windscreen.

The Instrument Panel
The instrument panel consists of a set of gauges or meters, which provide details about various car parameters. You will usually find the following in a typical car:

The Speedometer – tells you the speed.
The Odometer – tells you the distance covered.
The Temperature Gauge – tells you the coolant temperature.
The Fuel Gauge – indicates the fuel level in the tank.

Warning Lamps – Each warning lamp has a specific purpose that is illustrated in the owner’s manual. What’s important to keep in mind is that all warning lamps must be off when the engine is running and you’re driving the car. If even one of them is on, you must park the car at a safe location and contact the helpline number provided by the manufacturer.

ECU
ECU stands for Engine Control Unit. It is the electronic brain of your car, that controls everything from managing fuel injection to very advanced operations in high end cars.

Enjoy your car!

Liked the article? Like or follow our social pages on Facebook, Twitter, or LinkedIn to get your regular feed of Wheels Wisdom articles.